VirtNav1 and VirtNav2 Pages
These pages display dials similar to conventional VOR and ADF dials. They can be used
for IFR training IN VFR CONDITIONS where the
conventional dials are not available in the aircraft or the beacons are not readily
available in the area. They can also be used as backup dials for instrument flight.
A sample training would be to use a VOR approach plate as an NDB approach when there are
no NDB approaches available nearby. You would select the VOR approach's FAF as the
beacon and then select ADF mode for the display.
USE ONLY FOR TRAINING IN VFR CONDITIONS or as
backup in other instrument flying. Be especially wary when
using the ILS mode, as the altitude in these GPS receivers is notoriously
inaccurate, leading to inaccurate glideslope indications!
NOTE: This page is disabled when Option
Type B is checked so as to, in the words of
AC 120-76C
, block the GPS from providing false
or misleading information.
Using the page as a basic VOR dial

- Select either the VirtNav1 or VirtNav2 page.
- Click on the yellow text at the top. In the sample, that is where it says
VOR/DME LWM: LAWRENCE.... If the screen isn't 'tuned' to anything,
it will say [OFF] here.
- Type the ident of the VOR in the dialog box and click OK. You can also type the
ident of any NDB, localizer, airport (icaoid) or intersection in the box as
well.
- The yellow text at the top will indicate what waypoint is being used so you can
verify that it is using the one you want.
- Rotate the OBS dial by dragging your finger around the dial numbers.
- By default, the DME window will be tuned to the same waypoint. To set it to
something else, click on the DME numbers and enter the desired waypoint in the
dialog box. If elevation of the beacon is known, the distance will be slant-range
indicated by slanted (italic) numbers. Otherwise, over-the-ground distance will
be displayed by normal digits.
- By default, the dial is put in the mode appropriate to the waypoint selected. If
you want to, for example, use an ADF dial to navigate to a VOR navaid, just click
the mode button in the upper left corner to select ADF mode.
Note:
- When in VOR mode tuned to a VOR navaid, the radials used are those that would be
seen by a VOR receiver in the aircraft. This is indicated by the italics
Radial From: ...° To: ...° text. It is computed by taking
the great circle
bearing at the VOR to the aircraft, using the magnetic variation programmed into
the VOR by the FAA.
- In all other cases, the radial used is as would
be seen from the aircraft using the aircraft compass. It is indicated by normal
Radial From: ...° To: ...° text. It is computed by taking the
reciprocal of the
great circle bearing at the aircraft to the waypoint, using the magnetic variation
at the aircraft (as would be experienced by the aircraft's compass).
- For short distances (< 200nm), it does not make a difference. But coast-to-coast
can be significant. Here is example of from the Boston area to San Francisco using
the SFO VOR and the KSFO airport:


Localizer and ILS
Similarly, you can tune in a localizer or ILS. It will by default set the display to
LOC or ILS mode, depending on the beacon type. When the display is in LOC or ILS mode,
the OBS dial will be locked to the localizer heading. If you set the display to LOCBC
mode, the OBS dial will be locked to the reciprocal of the localizer heading. If you
set the display to VOR or ADF mode, WairToNow will behave as if there was a VOR or ADF
at the same spot as the localizer and you can rotate the dial freely.
- You can also select a runway and the app will pretend there is an ILS/DME on that
runway, whether or not there is one really there. To select a runway, click
the yellow name text (or [OFF]) and enter the runway name in the format
Iaptid.rwyid where aptid is an FAA or ICAO airport
ID and rwyid is a runway on that airport. If the runway is runway 1 to 9,
you must use two digits, eg, 03 for runway 3. So for example, enter IBOS.04R for
runway 4-right at Boston.
- It pretends there is a localizer/dme antenna for the selected runway 1000 ft
past the far end runway numbers, the glideslope antenna is 1000 ft down
from the near end runway numbers tilted at 3.25°.
- This feature should only be used in VMC conditions for
practicing ILS where there is no ILS available. It must not be used if there are
obstructions near the approach path, so a clear path must be
verified visually at all times.
- For typical vectoring, the glideslope intercept should be at 2000 ft AGL at least
8.0nm out from the numbers. You should intercept the glideslope at
approximately 5.7nm out from the numbers. The localizer should be intercepted
at approximately ±30° from the runway heading.
- There are approach plates available for these
synthetic localizers.
When doing a LOC BC approach, there are two options:
- LOC mode - the OBS will lock to the localizer forward heading and the needle will
reverse sense just like a real localizer needle.
- LOCBC mode - the OBS will lock to the approach runway heading and the needle will
forward sensing, ie, will behave as if the approach were a normal localizer approach.
- If HSI enabled, it won't matter if it is LOC or LOCBC mode, just the DME display
will be flipped over.
- You can practice reverse sensing needle in VMC with a
normal front-side localizer approach by using LOCBC mode, in which case the needle
will show reverse sensing. Make sure HSI is disabled so it doesn't flip the dial
back around. Use the same runway as the original front-side approach is for. Eg,
if using a LOC RWY 16 approach plate, the back-course approach will also be to RWY
16, not RWY 34, so you can use the same transitions and step-downs as the front-side
approach.
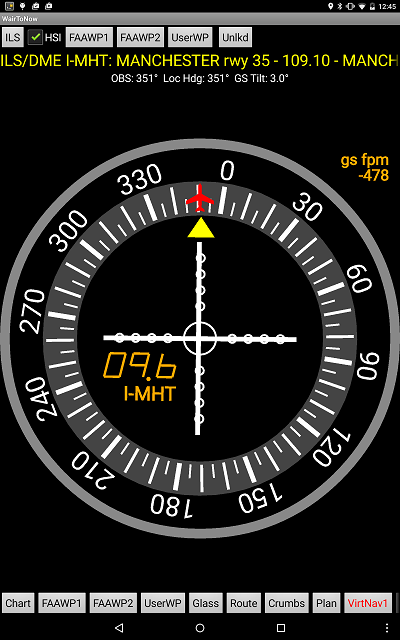
When in ILS mode, the dial will calculate what your descent rate should be to stay on
the glideslope, in feet per minute. This calculation is based on what the device's GPS
is showing for the aircraft's ground speed and the glideslope antenna tilt as provided
in the FAA database. The indication will appear in the upper right corner of the dial
window.
This is advisory only and you must follow your approved navigation system's glideslope
indications as the final authority.
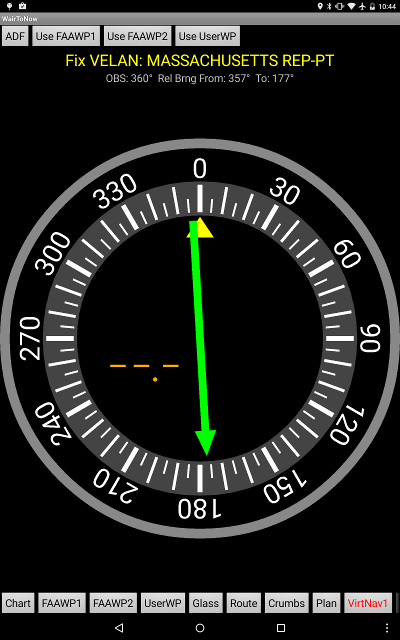
| Using the LWM-VOR-23 approach as an NDB approach |
Doing the MHT-ILS-35 approach with DME enabled and glideslope indication |
 |
 |
Automatic tuning
The VirtNav pages will attempt to automatically tune a navaid used by an approach so you
don't have to type the identifier in a dialog box.
- Use the Waypt1 or Waypt2 page to select the airport and
approach plate by clicking
the Waypt1 or Waypt2 button at the bottom of the screen and going from there to open
the approach plate.
- Open the VirtNav1 or VirtNav2 page and click the Waypt1 or Waypt2 button in the
upper left corner. It should tune in the navaid assuming the WairToNow database
knows what navaid that approach uses. Verify it is the correct one by looking at
the yellow text at the top of the screen.
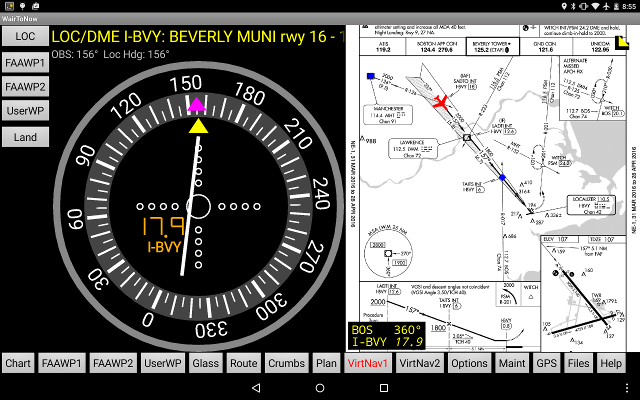
- If you rotate the display to landscape mode, the plate will be displayed in the
right-hand half of the screen.
| Doing the BVY-LOC-16 approach with plate |
|---|
 |
Automatically stepping through an approach procedure
For most approaches, the VirtNav page can step through an approach, automatically turning
the OBS dial as appropriate. This is called Coded Istrument Flight Procedure (CIFP) mode.
- Use the Waypt1 or Waypt2 page by clicking the Waypt1 or
FAAPW2 button at the bottom of the screen to select the airport and
approach procedure you want to use.
- Click the yellow triangle in the lower right corner of the approach plate. If there
is no triangle button there, this feature is not available for that approach. Select
the starting point (IAF) from the menu given.
- Colored dots should appear on the approach plate and a list of steps should appear
in the lower right corner of the plate. To get rid of the text, a short click will
collapse the text to a yellow triangle. A long click on the text or triangle will
open a menu giving the option to discontinue the approach or restart it from the
beginning.
- Open either the VirtNav1 or VirtNav2 page, then click the Waypt1 or Waypt2 button in
the upper left corner.
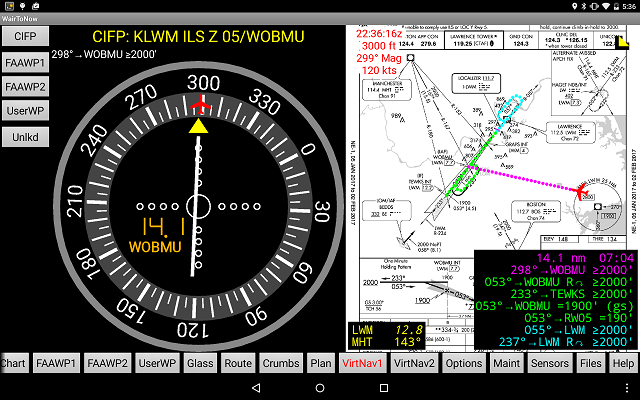
The dial should track your progress as you go along. When you are on the final approach
course within 3nm of the FAF, it will switch to glideslope mode to guide you down to the
runway. Outside of that, it will be in terminal mode with no glideslope provided.
Once you reach the missed approach point, it will automatically step through the published
missed approach sequence. The missed approach sequence is displayed with cyan dots and
text.
NOTE: The OBS dial is locked in place while in CIFP mode, indicating the magnetic course
for the current segment (depicted in magenta). The only exception is during the first
segment of a radar-vector approach, where you can set the vector heading in the OBS dial
by dragging your finger around the dial.
NOTE: If you change the IAF or the plate, you will have to re-tune the VirtNav dial to
use the new CIFP. Just re-click the Waypt1 or Waypt2 button in the upper left corner and
it will start tracking the new steps.
| Doing CIFP approach with text steps showing |
|---|
 |
| Doing CIFP approach with text steps hidden |
|---|
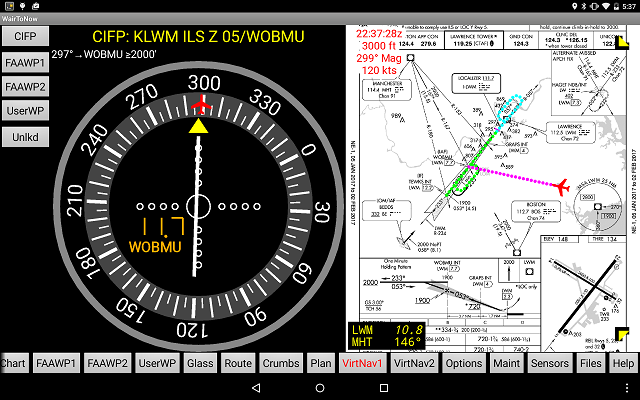 |